Creating ticket queues
Ticket queues are the place where messages from your customers go. You can create queues for each department in your company and assign agents to handle tickets.
In one company, separate ticket queues are created for each department (Sales, Service, Marketing and Recruitment) and a group of agents is assigned to each queue. Each department has a separate e-mail address to which customers write, so rules have been created that say that messages are directed to queues based on e-mail addresses, e.g. messages sent to marketing@abccompany.pl will go to the Marketing queue. This configuration will keep correspondence in order - agents will see and deal with tickets that are directly related to their department.
Important...⚠️
Agents will see messages only from those queues to which they are assigned.
From the Administration tab, select Tickets → Queues.

Then, in the Tickets queues section, click the  button on the right.

The following options appear:
- Name - enter the name of the queue,
- Work schedule - specify during which working hours the queue will be active - this will ensure that ticket processing times will be counted only during the set hours not including, for example, weekends,
- Replies will be sent from - choose from which email address messages will be sent to customers,
- Use user name, surname and e-mail as sender - you can choose whether the user's email address (provided in the user profile) will be displayed as the sender of the message along with the first name and last name.

Click 2 Contact
Name displayed in Click 2 Contact - the name of the displayed subject for the message module within the widget.
Ticket auto-assignments
The Thulium system allows you to automate the process of assigning tickets. Such functionality can be enabled for a given queue and for specific Agents assigned to it.
Confirmations
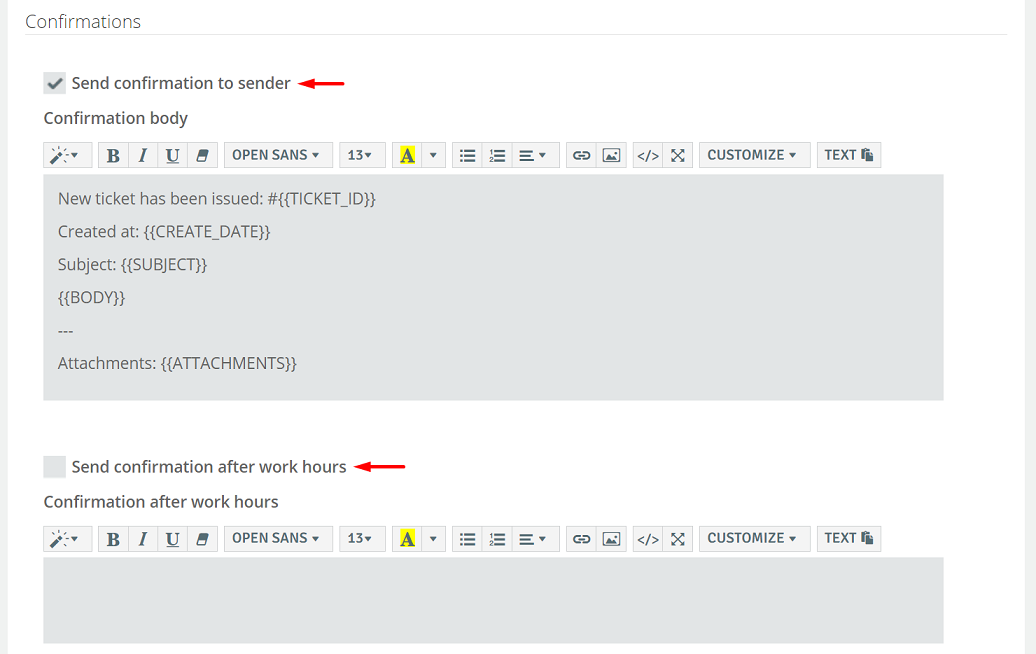
You can choose whether the sender of the message will receive confirmations (autoresponder/auto-reply) about its delivery and reading (by checking the checkbox). Confirmation is sent only after the first message is received in a new ticket.
In addition, you have the option to send another confirmation if you receive a message after business hours, which, for example, will inform the sender that the message will be delivered during service office hours.

By default, the message contains such information as the ID number of the ticket, the date the message was opened, the subject, the content and attachments. By expanding the  button, you can decide what information you want to include - it will be dynamically called up by the system.
Możliwe wartości:
{{SUBJECT}} - message subject,
{{BODY}} - message content,
{{USER_NAME}} - username,
{{USER_FIRST_NAME}} - user name,
{{USER_LAST_NAME}} - user surname
{{USER_AVATAR}} - user avatar,
{{CC}} - CC (persons in copy),
{{STATUS}} - ticket status,
{{ATTACHMENTS}} - attachments,
{{CREATE_DATE}} - message opening date,
{{ACCOUNT_MANAGER}} - account manager name,
{{SYSTEM_ID}} - unique identifier of the ticket system,
{{TICKET_ID}} - unique identifier of the ticket,
{{USER_JOB_TITLE}} - user position,
{{USER_PHONE_NUMBER}} - landline,
{{USER_CELL_NUMBER}} - cell phone,
{{USER_EMAIL}} - email address,
{{USER_FOOTER}} - user footer,
{{LAST_MESSAGE_QUOTE}} - quote of the last message,
{{RATE_:)_LINK}} - link to positive rating,
{{RATE_:|_LINK}} - neutral rating link,
{{RATE_:(_LINK}} - link to negative rating.
It is possible to set multiple confirmation of acceptance of a ticket after business hours (the customer wrote to us a couple of times within a given ticket) by setting the parameter:

To delay the sending of confirmations to the sender (after hours), you can enter the time in minutes (including and in the form of a range, such as 60-120).

Important...⚠️
For the correct operation of sending confirmations outside working hours for each message in the ticket and delayed dispatch, it is necessary to activate the "Send confirmation after working hours" functionality.
In order to exclude specific email addresses or domains from the process of sending confirmations in a given queue, enter such in the appropriate field:

Message format
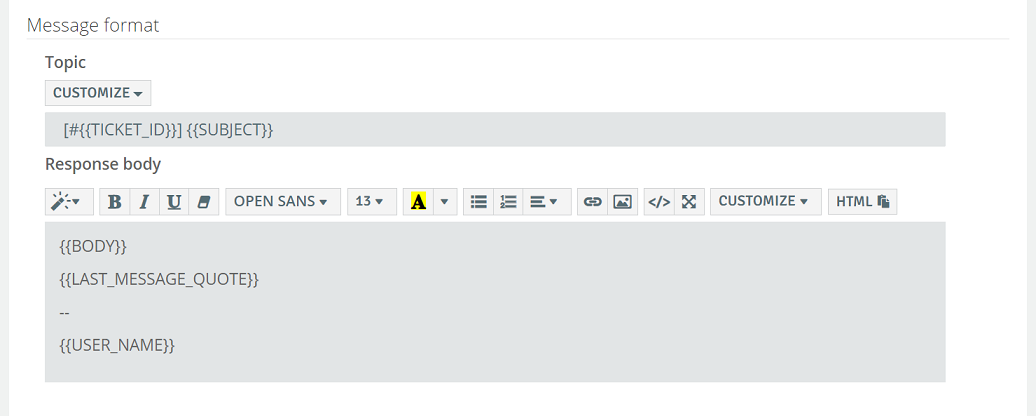
By default, the message sent to customers includes: the content, the quote of the last message and the name of the agent. You can customize the appearance of the message by expanding the  button and including, for example, an email address or a user footer.

Ticket summary
You have the ability to send a summary of all correspondence to customers. You can customize the appearance of the summary just as you do with the confirmation and message content.

Other options
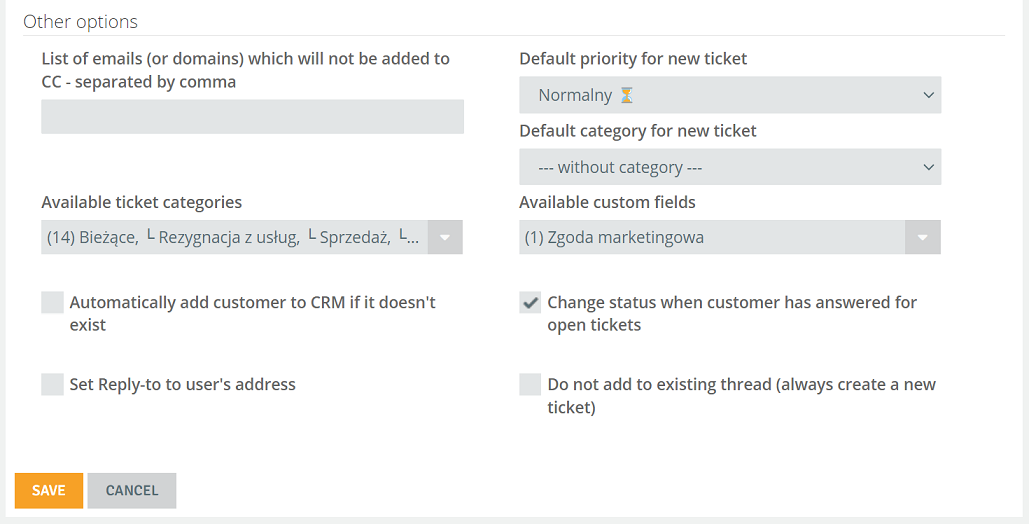
- List of emails (or domains) which will not be added to CC - separated by comma - addresses (e.g., forms from allegro), which will not be placed in CC. If there are more addresses than one, they should be preceded by a comma (,) without spaces.
Did you know...💡
Mail aliases are addresses that point to an existing mail account. An alias is not a separate mail account, i.e., you can't log into the alias or send email from it.
- Default category for new ticket - default category that a new ticket will have in the system,
- Available ticket categories - list of categories to be selected from the list within a given queue,
- Default priority for new ticket - default priority that a new ticket will have in the system,
- Available custom fields - list of custom fields that will be available within a given queue of Tickets,
- Automatically add customer to CRM if it doesn't exist - ability to automatically add a customer to the CRM if their e-mail address is not in the database,
- Change status when customer has answered for open tickets - if the parameter is checked, the status of the ticket will automatically change to, for example, New after receiving a response from the customer, if the parameter is unchecked, the status of the ticket will not change,
- Do not add to existing thread (always create a new ticket) - each message to the mailbox (queue) will be treated as a new ticket.
Important...⚠️
In the case of switching a ticket from a queue that has a given category/custom field to one that does not have them selected, they will be visible as read-only. When trying to change the category, there will be an option to select another one but no longer the one that is unavailable (and currently set).
- Set Reply-to to user's address - this will ensure that the user's email address is shown in the Reply-to field in the message being sent.

After configuring the queue, confirm by clicking  and then
  .
.

Share your opinion with us